Make your own puffy paints

|
It’s easy to make your own puffy paints at home using this simple recipe, just 4 basic ingredients and a microwave! A fun messy play activity that will provide hours of fun for toddlers and preschoolers.
|


You might also be interested in ...
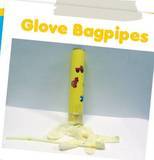
Glove bagpipes
Such fun! Kids will love these glove bagpipes. Teach them to play different notes and make up a band with their friends. They’ll learn about music and rhythm, perseverance, concentration and hand-eye co-ordination skills.

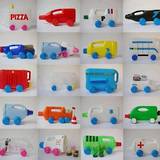
Make your own recycled trucks
Recycling can be so much fun! Kids will love playing with these recycled trucks made from old plastic bottles or containers and other items you have around the house. Building recycled trucks comes with benefits too, getting kids to use their imagination and concentration skills as they come up with different designs.
join usJoin us on social media for all our latest news. |
sign upSign up and receive our latest newsletters. |
|
A fun messy play activity that will provide hours of fun for toddlers and preschoolers.
Make your own puffy paints
Homemade puffy paints recipe
Ingredients
Extras
How to make your puffy paints
1. Using the large mixing spoon, mix the self raising flour and salt together in the large mixing bowl.
2. Divide the mixture into 4 parts and put one part into each of the smaller mixing bowls.
3. In the first small bowl add a few drops of the red food colouring (or whatever colour you choose) and a few drops of water and mix thoroughly using one of the small mixing spoons.
4. Continue adding more water until the mixture is thick and gloopy.
5. Pour the mixture into a zip lock bag and zip up the bag.
6. Cut a tiny hole in corner of the bag so the mixture can be squeezed out.
7. Repeat steps 3 to 6 using the mixture in the other three small bowls. Add blue food colouring to one bowl, yellow food colouring to another and green food colouring to the last one.
8. Use a different small spoon to mix each bowl to help stop colours merging.
9. Once all zip lock bags are ready to go, you can start painting! Just squeeze out the paint onto the thick card as you paint your picture.
10. Once your picture is ready, put the artwork in the microwave 30 - 40 seconds on high.
11. The puff paint should come out dry and puffed.
12. Timings may need to be adjusted to suit your microwave.
More kids painting articles to enjoy
- How to make shaving foam paint
- How to make your own edible finger paints
- Sparkly paints
Image source: mojosavings.com