Shop
02402
https://www.under5s.co.nz/shop/Hot+Topics+Articles/Toys+Books+Play/Sensory+play/Make+your+own+zip+sensory+board.html
Make your own zip sensory board
|
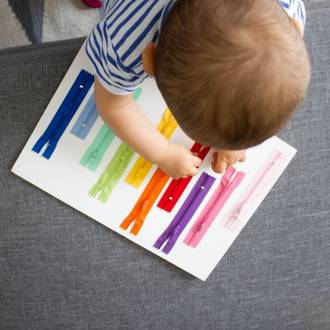
Interactive zip sensory boards or busy boards are really easy to make and great for developing your toddler’s fine motor skills. Zip sensory boards are hands-on and engaging, and a great learning through play and sensory activity. All you need are some old zips of different colours and sizes, stiff card or an old cardboard box and glue.
|
You might also be interested in ...
Make your own rainbow salt tray
Have a go at making your own rainbow salt tray. Toddlers and preschoolers will have lots of fun watching the colours come through when they draw pictures, create patterns and write their name in the salt. It is cheap to set up and you will already have the items at home.
Make your own toy sail boats
These toy sail boats are easy to make and perfect for summer time. Kids can play with them in a paddling pool or bucket of water, or even in the bath before bed. They are great as an educational tool too.
join usJoin us on social media for all our latest news. |
sign upSign up and receive our latest newsletters. |
|


Zip sensory boards are hands-on and engaging, and a great learning through play and sensory activity.
All you need are some old zips of different colours and sizes, stiff card or an old cardboard box and glue.
Make your own zip sensory board
What you will need for your zip sensory board
How to make your zip sensory board
1. Take your piece of card and arrange the zips on top of it. Move the zips around until you’re happy with your sensory board design.
If the piece of card is too big, cut it down to size or if the piece of card is too small, you may need to remove some of the zips.
You can either have the zips running in the same direction up and down your sensory board, or have them all running in different directions; vertical, diagonal and horizontal.
2. When you’re happy with your sensory board design you can begin to glue the zips down.
Just add glue to the fabric sides of the zip. Avoid getting glue on the middle of the zips to ensure they aren’t glued shut.
3. Once all the zips have been glued onto your sensory board, turn the piece of card over and press down hard to ensure the zips stick firmly to the card.
Or instead of pressing down hard, you can put heavy books on top of the overturned cardboard and leave it for a day or two to allow the zips to fully set.
Toddlers fingers tend to pull and grab at things, so you want the zips to be as secure as possible.
More kids activities articles to enjoy
- Make your own sensory board
- Getting creative with your under fives
- 13 Ideas for toys on a budget
Image source: zouerlipopette