Shop
02487
https://www.under5s.co.nz/shop/Hot+Topics+Articles/Activities/Things+to+make/Make+your+own+painted+rocks.html
Make your own painted rocks
|
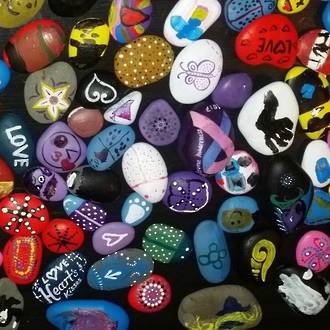
Painted rocks are easy to make at home with kids of all ages. A fun way to transform plain rocks using bright colourful patterns, drawings and messages. Use your rocks as decoration or join the painted rocks craze, hiding your decorated rocks at random for others to find.
|
You might also be interested in ...
Make your own ice world
Make your own ice world and watch as it starts to melt and change as the ice warms up. A great water play and sensory play activity for toddlers and preschoolers to enjoy over summer.
How to make your own Easter baskets
Looking for kids Easter craft ideas? Why not make some fun Easter Baskets for the kids this year. Two easy Easter basket designs made from paper cups and craft supplies – an Easter rabbit and an Easter chick! Perfect for little Easter eggs.
join usJoin us on social media for all our latest news. |
sign upSign up and receive our latest newsletters. |
|


A fun way to transform plain rocks using bright colourful patterns, drawings and messages.
Use your rocks as decoration or join the painted rocks craze, hiding your decorated rocks at random for others to find.
Hiding rocks and searching for painted rocks others have made is a fun outdoor activity. A great opportunity to get your kids outside and a good way to explore your local parks and surrounding area.
Have a go at this painted rocks idea from our friends at Mud Mates.
Make your own painted rocks
What you’ll need for your painted rocks
Preparing your painted rocks
1. Find a selection of flat surfaced rocks, somewhere between the size of an egg and a tennis ball.
2. Start painting and decorating your rocks. You can paint the rocks a single colour, paint them with patterns or pictures.
3. Once the paint has dried, use the vivid pen to write on the back of the rocks with a hashtag such as #your-town rocks e.g. #AucklandRocks.
4. To seal and protect your rocks from the weather, you can paint on a clear sealer (optional).
5. When your rocks are ready, take a trip to your local park and start hiding your rocks.
Tips for your painted rocks
More kids activities articles to enjoy:
Source: This article was written by Mud Mates - Taking care of messy kids with protective over-garments, perfect for dirty, messy play, indoors and out.