Shop
02153
https://www.under5s.co.nz/shop/Hot+Topics+Articles/Activities/Kids+Seasonal+Activities/Christmas/Paper+plate+Christmas+trees.html
Paper plate Christmas trees
|
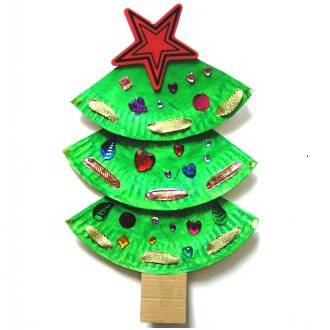
Christmas craft activities are lots of fun for kids of all ages. Have fun this year and make your own paer plate Christmas trees with paper plates, paint, ribbons and decorations.
|
You might also be interested in ...
Exploding paint bags
Your toddler or preschooler will love making their own exploding paint bags! A fun science and outdoor messy play activity that’s easy to do at home. All you need to do is make your own chalk paints and then watch as the paint bags explode with a ‘pop’!
How to make snow paint
Make your own snow paint at home with the kids. Such a fun winter activity for toddlers and preschoolers that you can do inside when it's wet and cold. An easy paint recipe you can adapt for all sorts of snow and winter creations.
join usJoin us on social media for all our latest news. |
sign upSign up and receive our latest newsletters. |
|


Have fun this year and make your own paper plate Christmas trees using this idea from our friends at Mud Mates, with paper plates, paint, ribbons and decorations.
How to make paper plate Christmas trees
What you’ll need for each Christmas tree
How to make your paper plate Christmas tree
1. Using the paint brush, get your little one to paint the paper plate with the green paint.
2. Leave the plate to dry completely.
3. Once the paint is completely dry use the scissors to cut the plate into three sections, making one section slightly smaller for the top of the Christmas tree.
4. Using the hole punch, punch 6 holes around the bottom of each of the three plate sections.
5. Pin the safety pin to the end of one piece of ribbon and guide your child as they thread it through the holes on the first section. Start by coming up through the back of the first hole then down through the next hole, continuing through all the holes.
6. Tape the ends of the ribbon to the back of the plate.
7. Repeat steps 5 and 6 with the other two ribbons and plate sections.
8. When all three sections are laced with the ribbon, staple them together to form your Christmas tree.
9. Cut a rectangle out of the brown card and staple this to the bottom of the tree for the trunk.
10. Using the glue, stick the star-shaped foam sticker to the top of the tree.
11. Lastly get your little one decorate the tree using the glue and whatever embellishments you have available (sequins, rhinestones, stickers, glitter etc)
Tips for your paper plate Christmas trees
More kids activities articles to enjoy:
Source: This article was written by Mud Mates - Taking care of messy kids with protective over-garments, perfect for dirty, messy play, indoors and out.