Shop
02197
https://www.under5s.co.nz/shop/Hot+Topics+Articles/Activities/Kids+Seasonal+Activities/Easter/Make+your+own+marbled+Easter+eggs.html
Make your own marbled Easter eggs
|
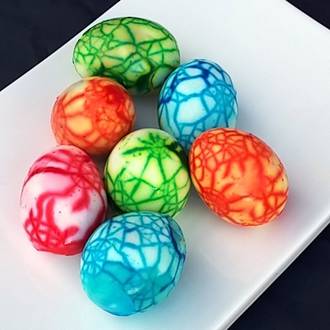
Have fun this Easter making your own marbled Easter eggs for the kids. This edible Easter activity is a take on dying hard boiled eggs, but you colour the white of the egg instead of the shell! Enjoy watching your kids faces when they discover what’s beneath the egg shell.
|
You might also be interested in ...
Glove bagpipes
Such fun! Kids will love these glove bagpipes. Teach them to play different notes and make up a band with their friends. They’ll learn about music and rhythm, perseverance, concentration and hand-eye co-ordination skills.
8 Tips on planning a party for toddlers & preschoolers
Need inspiration for your kids next birthday party? There are so many things to think about, but here's a quick guide to get you started.
join usJoin us on social media for all our latest news. |
sign upSign up and receive our latest newsletters. |
|


This edible Easter activity from our friends at Mud Mates is a take on dying hard boiled eggs, but you colour the white of the egg instead of the shell!
Enjoy watching your kids faces when they discover what’s beneath the egg shell.
Make your own marbled Easter eggs
Ingredients for your marbled Easter eggs
How to make your marbled Easter eggs
1. Take your cooled, hard-boiled eggs and on a paper towel, tap the eggs gently until the shell starts to shatter.
2. Repeat the gentle tapping all around each egg taking care not to crack the shell too hard. The eggs should be cracked/shattered all over but the shells should still be intact.
3. In a glass, cup or mug mix together one of the food colouring colours (approx. 20-30 drops to ensure a bright, vibrant colour or less if you prefer), 1 tablespoon of white vinegar to help set the colour and top up with cold water so the glass, cup or mug is about half full.
4. Place an egg on a dessert spoon and carefully place it into the glass, cup or mug. Depending on the size of your glass you may be able to fit one or two eggs at a time.
5. Top up the glass, cup or mug with water to ensure the eggs are totally covered.
6. Repeat steps 3 to 5 using the other eggs and food colouring colours.
7. For food safety if you plan to eat the eggs, place the glasses, cups or mugs in the fridge to keep the eggs cool.
8. If you can, leave the eggs overnight to develop a lovely deep colour, or at least for a couple of hours if you have less time.
9. Now for the fun part! Carefully remove the eggs from the glasses, cups or mugs and place them on a paper towel.
10. Very carefully peel the shells to reveal colourful marbled Easter eggs!
11. You can display your eggs over Easter or the kids can eat them as a fun snack.
More kids activities articles to enjoy:
Source: This article was written by Mud Mates - Taking care of messy kids with protective over-garments, perfect for dirty, messy play, indoors and out.